This tutorial covers:
Step 1: Back up & Clean up (optional)
The best way to start modding Minecraft is wiping away any old stuff that may disturb any of the mods. This may be unnecessary, but better do it the clean way from the beginning than regretting it afterwards as nothing works.
1.1. Back up files
Access your .minecraft folder (by typing "%appdata%" into the search bar of the home menu and pressing Enter) and drag out all the files you want to keep onto your desktop. This may mainly be:
- Singleplayers world saves (folder "saves")
- Screenshots taken with F2 (folder "screenshots")
- Resourcepacks (folder "resource packs")
- Log files (maybe at some point in the future you need to know what someone said a year ago on MCME, this is where you may find it), (folder "logs")
- Previous mod data (Shaderpacks, Minimap renders, ...)
1.2. Clean up
Step 2: Download required files
Step 3: Install Forge
Step 4: Install Mods
5. Allocate more RAM to Minecraft
With more RAM allocated the performance should increase.
Add the backed up files from step one again to your .minecraft. The installer files for Minecraft, Forge and Liteloader can be deleted.
Congratulations, if everything works nicely, you're done now!
Disclaimer: If it doesn't work I cannot help you either, sorry.
- Forge 1.10.2
- Optifine 1.10.2 HD Ultra with Shaders Mod
- Journeymap 1.10.2
- Incrase allocated RAM for better performance
Step 1: Back up & Clean up (optional)
The best way to start modding Minecraft is wiping away any old stuff that may disturb any of the mods. This may be unnecessary, but better do it the clean way from the beginning than regretting it afterwards as nothing works.
1.1. Back up files
Access your .minecraft folder (by typing "%appdata%" into the search bar of the home menu and pressing Enter) and drag out all the files you want to keep onto your desktop. This may mainly be:
- Singleplayers world saves (folder "saves")
- Screenshots taken with F2 (folder "screenshots")
- Resourcepacks (folder "resource packs")
- Log files (maybe at some point in the future you need to know what someone said a year ago on MCME, this is where you may find it), (folder "logs")
- Previous mod data (Shaderpacks, Minimap renders, ...)
1.2. Clean up
- Delete the .minecraft folder.
- Log in at minecraft.net and download the matching Minecraft installer.
- Uninstall Minecraft using the installer.
- Run the launcher again and install Minecraft freshly.
- Start the launcher and log in (you may need to use your E-Mail if you migrated your account which is very likely you did.)
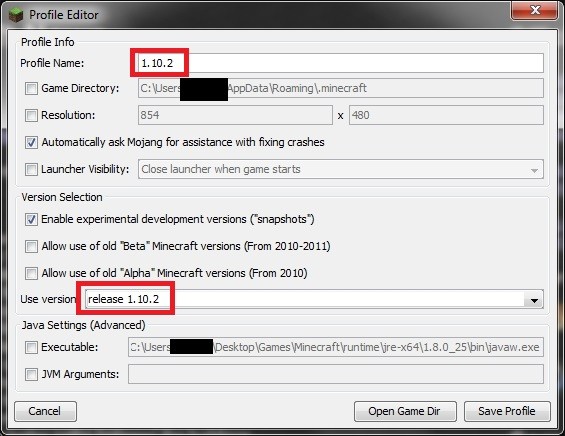
- The selected profile in the lower left bottom of the window should bear your username. Click on "Edit Profile" below, rename the Profile "1.10.2" and make sure the respective version is selected from the dropdown menu:
- Start the game.
- Add a new singleplayer world on creative mode.
- Enter the world and check whether everything behaves normally.
- Close the game. (= Really close minecraft, not only go back to main menu!)
Step 2: Download required files
Download the files from the list below and save them to your desktop. If any of the links is broken, a quick google search ("forge 1.10.2") will quickly give you what you look for.
Do exactly use the versions mentioned below, compatibility is not granted else!
- Forge >>download<< Click on "Show all downloads" and find version 12.18.0.2002.
- OptiFine >>download<< Find version OptiFine 1.10.2 HD U C2 and download it. (The shader mod is now included in OptiFine)
- Journeymap >>download<<
Step 3: Install Forge
- Launch the Forge Installer.
- Select "Install client" (default)
- A window should pop up saying you that it successfully added forge to the launcher.
- Launch Minecraft.
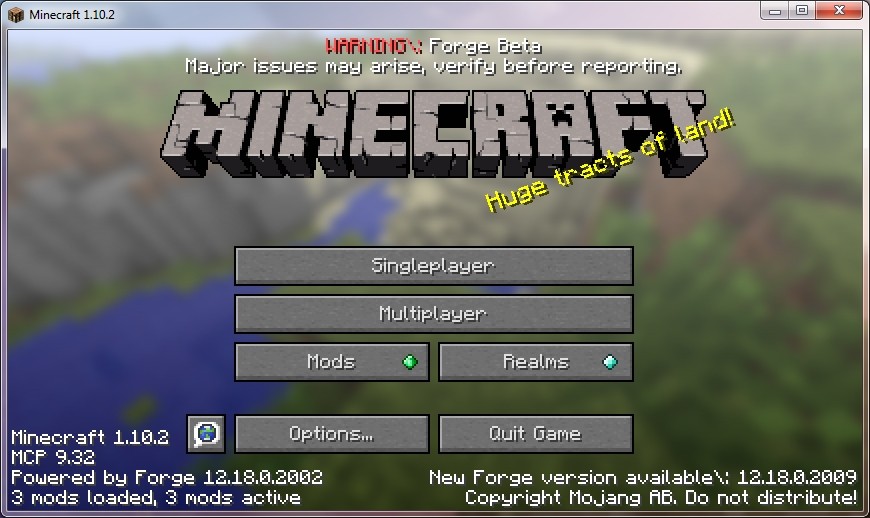
- Select the "forge" profile and start the game (optional: rename the profile to something else, e.g. "1.10.2 [Forge|OptiFine|Journeymap]"
- After the fancy new startup animation the main menu should now have some notes regarding Forge on it:
- Open the Singleplayer world from before and check whether everything is behaving normally.
- Close Minecraft.
Step 4: Install Mods
- Access your .minecraft folder (Type %appdata% in search bar of Windows Start menu).
- There now should be a folder called "mods", if not, create it.
- In the mods folder create a new folder called "1.10.2"
- Drag only the Optifine file from your desktop into that folder (for your convenience: don't close that folder yet
") )
) - Start Minecraft using the Forge profile.
- Open the Singleplayer world from before. Press Escape and go to "Options" --> "Video Settings". You should now be able to choose more options:
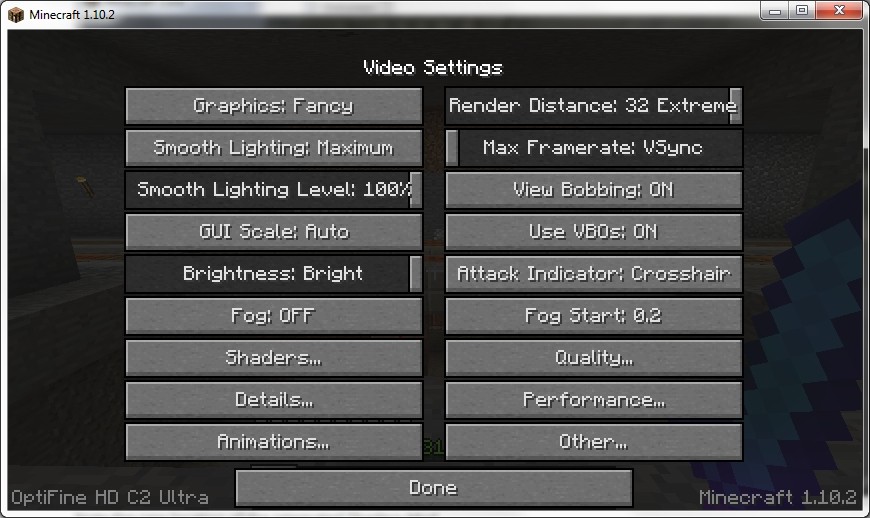
Note the new location of the integrated Shaders Mod. - Download yourself some shaderpacks (google for some, I'm using >>SEUS<, >>KUDA<<, Chocapic13, ConquestOfTheSun, MrMeepz and Sildur's Vibrant Shaders (you'll find all of those with Google) your graphic card may not be friends with every shader, just try some if they work, SEUS is a good one to start. Don't get yourself the most extreme shader version to start if you're not sure how much your PC can handle )
- Make sure the game behaves normally, then close Minecraft again.
- Drag the Journeymap file into your mods folder.
- Start the game and open the Singleplayer world again.
- On the top right should now be a vey fancy minimap!
- Again navigate to the controls menu and adjust the Journeymap controls to your liking.
- Press the "J" key (or whatever key you assigned above) to access the Full Map. On the right hand side you have another options button which lets you adjust all aspects of the maps.
5. Allocate more RAM to Minecraft
With more RAM allocated the performance should increase.
- Start the launcher, select the profile you want to play with increased RAM.
- Click "edit profile".
- At the very bottom, write the following into the text field "JVM Arguments" (it may already contain "-Xmx1G" and other settings, adjust the RAM setting and leave the rest untouched)
-Xmx2G for 2GB RAM allocated
-Xmx4G for 4GB RAM allocated
-Xmx8G for 8GB RAM allocated
-Xmx16G for 16GB RAM allocated
Note: As programs running in the background do too need some RAM it won't work if you allocate the amount of RAM your machine has; e.g. I have 32GB RAM but do only allocate 16GB. - Be sure the box next to it is checked.
- Click "Save Profile" and start game.
- Press F3 when you're in a world and check whether the available amount of RAM has changed (won't be exactly the amount you entered).
Add the backed up files from step one again to your .minecraft. The installer files for Minecraft, Forge and Liteloader can be deleted.
Congratulations, if everything works nicely, you're done now!
Disclaimer: If it doesn't work I cannot help you either, sorry.
This tutorial covers:
Step 1: Back up & Clean up (optional)
The best way to start modding Minecraft is wiping away any old stuff that may disturb any of the mods. This may be unnecessary, but better do it the clean way from the beginning than regretting it afterwards as nothing works.
1.1. Back up files
Access your .minecraft folder (by typing "%appdata%" into the search bar of the home menu and pressing Enter) and drag out all the files you want to keep onto your desktop. This may mainly be:
- Singleplayers world saves (folder "saves")
- Screenshots taken with F2 (folder "screenshots")
- Resourcepacks (folder "resource packs")
- Log files (maybe at some point in the future you need to know what someone said a year ago on MCME, this is where you may find it), (folder "logs")
- Previous mod data (Shaderpacks, Minimap renders, ...)
1.2. Clean up
Step 2: Download required files
Step 3: Install Forge
Step 4: Install Mods
Step 5: Allocate more RAM to Minecraft
With more RAM allocated the performance should increase.
Add the backed up files from step one again to your .minecraft. The installer files for Minecraft, Forge and Liteloader can be deleted.
Congratulations, if everything works nicely, you're done now!
Disclaimer: If it doesn't work I cannot help you either, sorry.
- Forge 1.8.8
- Optifine 1.8.8 HD Ultra with Shaders Mod
- Journeymap 1.8.8
- Incrase allocated RAM for better performance
Step 1: Back up & Clean up (optional)
The best way to start modding Minecraft is wiping away any old stuff that may disturb any of the mods. This may be unnecessary, but better do it the clean way from the beginning than regretting it afterwards as nothing works.
1.1. Back up files
Access your .minecraft folder (by typing "%appdata%" into the search bar of the home menu and pressing Enter) and drag out all the files you want to keep onto your desktop. This may mainly be:
- Singleplayers world saves (folder "saves")
- Screenshots taken with F2 (folder "screenshots")
- Resourcepacks (folder "resource packs")
- Log files (maybe at some point in the future you need to know what someone said a year ago on MCME, this is where you may find it), (folder "logs")
- Previous mod data (Shaderpacks, Minimap renders, ...)
1.2. Clean up
- Delete the .minecraft folder.
- Log in at minecraft.net and download the matching Minecraft installer.
- Uninstall Minecraft using the installer.
- Run the launcher again and install Minecraft freshly.
- Start the launcher and log in (you may need to use your E-Mail if you migrated your account which is very likely you did.)
- The selected profile in the lower left bottom of the window should bear your username. Click on "Edit Profile" below, rename the Profile "1.8.8" and make sure the respective version is selected from the dropdown menu:
View attachment 5292 - Start the game.
- Add a new singleplayer world on creative mode.
- Enter the world and check whether everything behaves normally.
- Close the game. (= Really close minecraft, not only go back to main menu!)
Step 2: Download required files
- Download the files from the list below and save them to your desktop. If any of the links is broken, a quick google search ("forge 1.8.8") will quickly give you what you look for.
Do exactly use the versions mentioned below, compatibility is not granted else!
- Forge >>download<< Click on "Show all downloads" and find version 11.15.0.1647. (Take Installer or Installer-win)
- OptiFine >>download<< Find version OptiFine 1.8.8 HD U G9 and download it. (The shader mod is now included in OptiFine)
- Your desktop may then look somewhat like this:
Step 3: Install Forge
- Launch the Forge Installer.
- Select "Install client" (default)
- A window should pop up saying you that it successfully added forge to the launcher.
- Launch Minecraft.
- Select the "forge" profile and start the game (optional: rename the profile to something else, e.g. "1.8.8 [Forge|OptiFine|Journeymap|XRay]"
- After the fancy new startup animation the main menu should now have some notes regarding Forge on it:
View attachment 5294
- Open the Singleplayer world from before and check whether everything is behaving normally.
- Close Minecraft.
Step 4: Install Mods
- Access your .minecraft folder (Type %appdata% in search bar of Windows Start menu).
- There now should be a folder called "mods", if not, create it.
- In the mods folder create a new folder called "1.8.8"
- Drag only the Optifine file from your desktop into that folder (for your convenience: don't close that folder yet )
- Start Minecraft using the Forge profile.
- Open the Singleplayer world from before. Press Escape and go to "Options" --> "Video Settings". You should now be able to choose more options:
View attachment 5295
Note the new location of the integrated Shaders Mod. - Download yourself some shaderpacks (google for some, I'm using >>SEUS<, >>KUDA<<, Chocapic13, ConquestOfTheSun, MrMeepz and Sildur's Vibrant Shaders (you'll find all of those with Google) your graphic card may not be friends with every shader, just try some if they work, SEUS is a good one to start. Don't get yourself the most extreme shader version to start if you're not sure how much your PC can handle )
- Make sure the game behaves normally, then close Minecraft again.
- Drag the Journeymap file into your mods folder.
- Start the game and open the Singleplayer world again.
- On the top right should now be a vey fancy minimap!
- Again navigate to the controls menu and adjust the Journeymap controls to your liking.
- Press the "J" key (or whatever key you assigned above) to access the Full Map. On the right hand side you have another options button which lets you adjust all aspects of the maps.
Step 5: Allocate more RAM to Minecraft
With more RAM allocated the performance should increase.
- Start the launcher, select the profile you want to play with increased RAM.
- Click "edit profile".
- At the very bottom, write the following into the text field "JVM Arguments" (it may already contain "-Xmx1G" and other settings, adjust the RAM setting and leave the rest untouched)
-Xmx2G for 2GB RAM allocated
-Xmx4G for 4GB RAM allocated
-Xmx8G for 8GB RAM allocated
-Xmx16G for 16GB RAM allocated
Note: As programs running in the background do too need some RAM it won't work if you allocate the amount of RAM your machine has; e.g. I have 32GB RAM but do only allocate 16GB. - Be sure the box next to it is checked.
- Click "Save Profile" and start game.
- Press F3 when you're in a world and check whether the available amount of RAM has changed (won't be exactly the amount you entered).
Add the backed up files from step one again to your .minecraft. The installer files for Minecraft, Forge and Liteloader can be deleted.
Congratulations, if everything works nicely, you're done now!
Disclaimer: If it doesn't work I cannot help you either, sorry.
