Contents
An asterisk * marks chapters that are most likely relevant for MCME Build Mods.
1. Basics
1.1. *Selecting materials
1.2. *Other basic Commands
1.3. *Arrow and gunpowder
1.4. Other non-brush commands
2. Performers1.2. *Other basic Commands
1.3. *Arrow and gunpowder
1.4. Other non-brush commands
1.1.4. Goto /goto
1.1.5. (Ultimate) Undo User /uu, /uuu
1.5. Cheat Sheet1.1.5. (Ultimate) Undo User /uu, /uuu
2.1. *Place Performers
2.2. *Replace Performers
2.3. *No-Physics Performer
2.4. Include Performers and Voxel List
2.5. Exclude Performers
2.6. Noundo Performer
3. Shape Brushes2.2. *Replace Performers
2.3. *No-Physics Performer
2.4. Include Performers and Voxel List
2.5. Exclude Performers
2.6. Noundo Performer
3.1. *General Info on Brushes
3.2. *Snipe Brush /b s
3.3. *Ball Brush /b b
3.4. *Disc Brush /b d
3.5. Disc Face Brush /b df
3.6. Voxel Brush /b v
3.7. Voxel Disc Brush /b vd
3.8. Voxel Disc Face Brush /b vdf
3.9. Cylinder Brush /b c
3.10. Line Brush /b l
3.11. Jagged Line Brush /b j
3.12. Triangle Brush /b tri
3.13. Three-Point Circle Brush /b tpc [coming soon]
3.14. Ellipse Brush /b el [coming soon]
3.15. Ellipsoid Brush /b elo [coming soon]
3.16. Ring Brush /b ri
3.17. Dome Brush /b dome
3.18. Checker Voxel Disc Brush /b cvd
4. Erode Brushes3.2. *Snipe Brush /b s
3.3. *Ball Brush /b b
3.4. *Disc Brush /b d
3.5. Disc Face Brush /b df
3.6. Voxel Brush /b v
3.7. Voxel Disc Brush /b vd
3.8. Voxel Disc Face Brush /b vdf
3.9. Cylinder Brush /b c
3.10. Line Brush /b l
3.11. Jagged Line Brush /b j
3.12. Triangle Brush /b tri
3.13. Three-Point Circle Brush /b tpc [coming soon]
3.14. Ellipse Brush /b el [coming soon]
3.15. Ellipsoid Brush /b elo [coming soon]
3.16. Ring Brush /b ri
3.17. Dome Brush /b dome
3.18. Checker Voxel Disc Brush /b cvd
4.1. *Fill Brush /b e fill
4.2. *Lift Brush /b e lift
4.3. *Melt Brush /b e melt
4.4. *Smooth Brush /b e smooth
4.5. Floatclean Brush /b e floatclean
4.6. Erode Brush /b e [not available]
4.7. Random Erode Brush /b re
5. Blend Brushes [Coming soon]4.2. *Lift Brush /b e lift
4.3. *Melt Brush /b e melt
4.4. *Smooth Brush /b e smooth
4.5. Floatclean Brush /b e floatclean
4.6. Erode Brush /b e [not available]
4.7. Random Erode Brush /b re
5.1. *Blend Ball Brush /b bb
5.2. *Blend Disc Brush /b bd
5.3. Blend Voxel Brush /b bv
5.4. Blend Voxel Disc Brush /b bvd
6. Splatter Brushes [Coming soon]5.2. *Blend Disc Brush /b bd
5.3. Blend Voxel Brush /b bv
5.4. Blend Voxel Disc Brush /b bvd
6.1. *Splatter Ball Brush /b sb
6.2. Splatter Disc Brush /b sd
6.3. Splatter Voxel Brush /b sv
6.4. Splatter Voxel Disc Brush /b svd
6.5. *Splatter Overlay Brush /b sover
6.6. Blob Brush /b blob
7. Other terrain brushes [Coming soon]6.2. Splatter Disc Brush /b sd
6.3. Splatter Voxel Brush /b sv
6.4. Splatter Voxel Disc Brush /b svd
6.5. *Splatter Overlay Brush /b sover
6.6. Blob Brush /b blob
7.1. *Fill-Down Brush /b fd
7.2. *Drain Brush /b drain
7.3. *Biome Brush /b biome
7.4. *Overlay Brush /b over
7.5. Underlay Brush /b under
7.6. Set Brush /b set
7.7. Snow Brush /b snow
7.8. Clean Snow Brush /b cls
7.9. Tree Snipe Brush /b t
7.10. Generate Tree Brush /b gt
8. Move, Rotate and Copy Brushes [coming soon]7.2. *Drain Brush /b drain
7.3. *Biome Brush /b biome
7.4. *Overlay Brush /b over
7.5. Underlay Brush /b under
7.6. Set Brush /b set
7.7. Snow Brush /b snow
7.8. Clean Snow Brush /b cls
7.9. Tree Snipe Brush /b t
7.10. Generate Tree Brush /b gt
8.1. Move Brush /b mv
8.2. Clone Stamp Brush /b cs
8.3. CopyPasta Brush /b cp
9. Special brushes [Coming soon]8.2. Clone Stamp Brush /b cs
8.3. CopyPasta Brush /b cp
9.1. *Sign Overwriter Brush /b sio
9.2. *Erase Brush /b erase
9.3. Entity Removal Brush /b er
9.4. Ruler Brush /b r
9.5. VoltMeter Brush /b volt
9.6. Scanner Brush /b sc
9.7. Extrude Brush /b ex
9.8. Spiral Staircase Brush /b sstair
9.9. Generate Chunk Brush /b gc
10. Stencils9.2. *Erase Brush /b erase
9.3. Entity Removal Brush /b er
9.4. Ruler Brush /b r
9.5. VoltMeter Brush /b volt
9.6. Scanner Brush /b sc
9.7. Extrude Brush /b ex
9.8. Spiral Staircase Brush /b sstair
9.9. Generate Chunk Brush /b gc
10.1. *Stencil Brush /b st
10.2. *Stencil List Brush /b sl
10.3. *[Addon] StencilList plugin by CaptainDagless /sl
10.4. *[Addon] Voxelviewer /vv
11. Fun brushes [Coming soon]10.2. *Stencil List Brush /b sl
10.3. *[Addon] StencilList plugin by CaptainDagless /sl
10.4. *[Addon] Voxelviewer /vv
11.1. *Jockey Brush /b jockey
11.2. *Entity Brush /b en
11.3. Warp Brush /b w
11.4. Lightning Brush /b light
11.5. Heat Ray Brush /b hr
11.6. Comet Brush /b com
11.7. Punish Brush /b p
12. Unknown / WIP11.2. *Entity Brush /b en
11.3. Warp Brush /b w
11.4. Lightning Brush /b light
11.5. Heat Ray Brush /b hr
11.6. Comet Brush /b com
11.7. Punish Brush /b p
12.1. Ocean Brush /b o
12.2. Flat Ocean Brush /b fo
12.3. Canyon Brush /b ca
12.4. Canyon Selection Brush /b cas
12.5. 2D Rotation Brush /b rot2
12.6. 3D Rotation Brush /b rot3
12.7. Shell Set Brush /b shs
12.8. Shell Voxel Brush /b shv
12.9. Shell Ball Brush /b shb
12.10. Spline Brush /b sp
12.11. Pull Brush /b pull
12.12. Block Reset Brush /b brb
12.13. Block Reset Brush Surface Only Brush /b brbs
11.14. Painting Brush /b paint
11.15. Set Redstone Flip Brush /b setrf
-----------------------------------------------------------------------------------------------------------------------------12.2. Flat Ocean Brush /b fo
12.3. Canyon Brush /b ca
12.4. Canyon Selection Brush /b cas
12.5. 2D Rotation Brush /b rot2
12.6. 3D Rotation Brush /b rot3
12.7. Shell Set Brush /b shs
12.8. Shell Voxel Brush /b shv
12.9. Shell Ball Brush /b shb
12.10. Spline Brush /b sp
12.11. Pull Brush /b pull
12.12. Block Reset Brush /b brb
12.13. Block Reset Brush Surface Only Brush /b brbs
11.14. Painting Brush /b paint
11.15. Set Redstone Flip Brush /b setrf
In a nutshell voxelling works like this:
- Select the brush. The brush mainly defines in what shape blocks get altered.
- Select the material(s): Define what material you want to place, and if needed, which to replace.
- Apply the brush using the arrow and gunpowder items.
*1.1. Selecting materials (Use either names or ID's):
Every block is technically defined by two numbers: The ID and the data value (aka "ink"). The ID is the number that defines the block type, e.g. "stone" (ID 1), "grass block" (ID 2) or "wool" (ID 35). The data value then serves to distinguish variants of a block that all share the same ID, e.g. "red wool" (ID 35, data value 14. or short 35:14). Note that some blocks have no variants (e.g. grass block). It is however still possible to place blocks with data values for which no special variant is defined. Usually this results in a block with the same properties as the variant with the default data value 0. It is not possible to place blocks with IDs for which no block is defined.
/v # - Select Place Material, e.g. /v 12 or /v SAND (not case-sensitive).
/vi # - Select Place Data Value (0 is default).
/vr # - Select Replace Material.
/vir # - Select Replace Data Value.
Example: For replacing black wool (ID 35:15) with red sand (ID 12:1) use the following commands:
/v 12, /vi 1, /vr 35, /vir 15
Materials can also be selected by left- and right-clicking blocks while sneaking (from any distance):
(Press your Sneak Key together with your Jump/Fly Key to sneak in the air).
- Left-click with arrow sets Place Material.
- Left-click with gunpowder sets Place Data Value.
- Right-click with arrow sets Replace Material.
- Right-click with gunpowder sets Replace Data Value.
*1.2. Other basic commands:
/b # - Set brush size (Attention: Large brush sizes cause lag and may eventually crash the server!). For most brushes the value entered means "Radius".
/vh # - Set height. Only needed for a few special brushes.
/b - Set previous brush.
/u - Undo last action.
/u # - Undo multiple actions at once (20 steps are saved, further can't be undone).
/d - Reset brush settings to default (Snipe Brush with air). May be useful before setting up more complicated brushes and when having finished voxelling to prevent accidental voxelling when running around with an arrow in the hand.
/vs - Display current brush settings.
/vs range # - Limits snipe range. Can be used to place stuff in air (e.g.floating wool disc markers)
/btool add -arrow - Apply the functions of the arrow to selected item in hotbar.
/btool add -powder - Apply the functions of the gunpowder to selected item in hotbar.
/btool remove - Remove Voxel abilities of selected item in hotbar.
*1.3. Arrow and gunpowder
Those two items are by default set as Voxel Tools. Their differences in use depend on the selected brush, but in general the arrow runs the selected brush at (in) the block targeted while the gunpowder runs it ontop resp. next to the target block (if a side face is clicked).
1.4. Other non-brush commands
1.1.4. Goto
/goto x z
A simple teleporting command similar to /tp, however it does only need the x and z arguments.
1.1.5. (Ultimate) Undo User
/uu <player>
/uuu <player>
Undo the snipes of other players (may be useful for teaching voxel). While /uu supports the use of abbreviated names (e.g. /uu fin to undo the actions of Finrod_Amandil) as long as the other player is online, /uuu can also undo others players actions while they are offline, however the full name has to be given there.
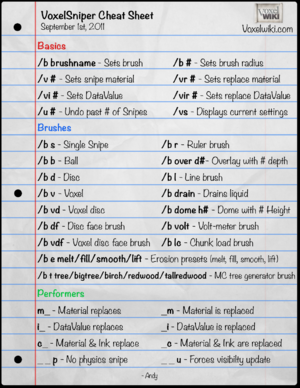
1.5. Cheat Sheet
A Cheat Sheet for reference:
-----------------------------------------------------------------------------------------------------------------------------
*2. Performers
The Performers define how most of the brushes handle the material they are used on; whether your brush shall affect all blocks in the brushes working radius or it shall only affect certain blocks. Also you define here whether you want to change only the block IDs, only the data value or both.
A list of all available Performers can be seen by typing /vs perf (short names) or /vs perflong (long names). A detailed description follows below.
If you have selected a brush that accepts performers and you want to change the performers without retyping the whole brush, use /p m, /p cc...
*2.1. Place Performers:
m - material - Only affects ID (leaves data value unchanged).
i - ink (=data value) - Only affects data values (leaves material ID unchanged).
c - combo - Affects both ID and data value.
Examples:
- For placing normal stone (ID 1, data value 0), use m performer (e.g. /b b m + /v 1).
- For changing any wool color to red (data value 14), use i performer (e.g. /b b i + /vi 14).
- For placing lime wool (ID 35, data value 5), use c performer (e.g. /b b c + /v 35 + /vi 5).
*2.2. Replace Performers:
If you don't want to just overwrite all blocks in the target area but rather only make the brush affect one certain kind of blocks, you need a Replace Performer. These consist of the same Performers as shown above, now simply using two letters. The first letter defines the Place material, the second one the Replace material.
Examples:
- To replace sand (ID 12) to stone (ID 1), use for example /b b mm + /v 1 + /vr 12.
- To replace red wool (ID 35, data value 12) to lime stained glass (ID 95, data value 5), use /b b cc + /v 95 + /vi 5 + /vr 35 + /vir 12.
- To replace any kind of sand (red sand + normal sand) (ID 12, data values 0 and 1) to stone with default data value (ID 1, data value 0), use /b b cm + /v 1 + /vi 0 + /vr 12.
- To recolor only red wool to lime wool (and leave any other wool color unaffected), use /b b ii + /vi 5 + /vir 14. (Attention: This would affect any material with data value 14 (e.g. red glass), so to go sure rather use /b b cc).
*2.3. No-Physics Performer
Mostly used to snipe single blocks, this additional Performer can make it possible to access blocks in certain positions where vanilla Minecraft wouldn't allow them and they would break upon the next block update. Note that on the Build Server many of those are possible without the need of No-Physics voxelling due to block updates being disabled. Still there are a few things where the No-Physics Performer is needed, for example double piston base chimneys. Be careful when building close to No-Physics-voxelled blocks, they may disappear when you edit blocks too close to them.
The letter for the No-Physics Performer is p. It is added as a second, respective third, Performer after a Place or Replace Performer (see above).
When only working with the i Performer, the No-Physics Performer is mostly not needed. For example making single piston base chimneys is possible by doing /b s i + /vi 9 on an existing normal piston. Also note that some things don't work even with the No-Physics Performer, for example placing a piston base directly with /b s cp + /v 33 + /vi 9. You have to do it with the i Performer.
Example:
- Making a double piston base (double chimney): Place two normal pistons next to each other and use /b s ip + /vi 9 on both.
On other servers things like floating ladders, floating torches or piston heads may require you to use the No-Physics Performer too.
As said this can also be used on Replace Performers, so the following Performers are possible too:
mmp, iip, ccp, mcp, cmp...
2.4. Include Performers and Voxel List
It is possible to make a brush only affect multiple predefined blocks.
To start, you have to define, which blocks you want to edit. For that you have to create a Voxel List. You add blocks to that list with /vl # (This doesn't support names, so /vl SAND won't work). As its not possible to use a Replace Performer here, the data values are handled differently: If you want to affect any kind of wool, type /vl 35. If you only want to affect red wool, type /vl 35:14. Its not possible to only affect the data values (e.g. to affect red wool, red stained glass, red stained glass panes, red stained clay and red carpet which all have a data value of 14 you have to define every item separately, you can't say "affect everything with data value 14"). You can add multiple blocks to the Voxel List by just using /vl # multiple times with different IDs. To clear the Voxel List use /vl clear. To remove specific items of the Voxel List use /vl -#, e.g. to remove gravel from the list, type /vl -13. This won't work with data values, so trying to remove red wool from the list with /vl -35:14 will do nothing.
Now for the actual Performers:
nm - change the ID of all selected blocks (doesn't affect their data values)
ni - change the data values of all selected blocks (the actual material stays the same)
nc - change ID and data value of selected blocks. (All selected blocks are guaranteed equal then)
Note: you can't combine these with the No-Physics Performer.
Examples:
- Replace all snow (ID 80), flat snow (ID 78, varying data values) stone (ID 1) and gravel (ID 13) to sand (ID 12) with data value 0: Use /vl 80 + /vl 78 + /vl 1 + /vl 13 + /b b nc + /v 12 + /vi 0
- Turn blue stained glass panes (ID 160:11) and lime wool (ID 35:5) red (data value 14) (while staying glass panes resp. wool): Use /vl 160:11 + /vl 35:5 + /b b ni + /vi 14
2.5. Exclude Performers
Same principle as the Include Performers (see above) except that you use the voxellist now to define those materials that you don't want to affect.
Performers:
xm - change ID
xi - change data value
xc - change ID and data value.
2.6. Noundo Performer
Working with this prevents the recording of the previous actions and thus not making it possible to undo. This may cause a bit less overall lag on the server, however as you aren't able to use any of the other Performers along with this one (then just the default Perfomer m is used), this is of rather limited use.
Performer:
noundo (e.g. /b b noundo)
-----------------------------------------------------------------------------------------------------------------------------
*3. Shape Brushes
*3.1. General info on Brushes
While the performers shown above define how Voxel should handle the materials, we always have to define a brush to declare in what shape blocks get affected and whether and how blocks are added, removed or exchanged. You literally always have to set a brush (while performers aren't always needed).
Every command setting a brush starts with /b (b for brush). This is followed by what brush it is and then often by one or multiple performers.
A list of all brushes can be seen by using /vs brushes.
Every Brush has a built-in help section which can be opened with /b <brush name> info, e.g. /b b info
A gray m behind the brush command indicates that to this brush Performers (see above) can be added.
*3.2. Snipe Brush
/b s m
The Snipe Brush will always only affect one single block. Used with the arrow it will replace the targeted block with the selected block, the gunpowder adds one single block ontop the target block.
If no brush is selected resp. the brush settings are resetted using /d a snipe brush with air as material gets selected.
*3.3. Ball Brush
/b b m
The Ball Brush affects blocks in a circular shape around the target block. Used very often to build up mountains (/b b m + /v sand) or to replace sand to stone (/b b mm + /v 1 + /vr 12). Be careful when building up mountains with sand voxel balls, if you place the ball so that it results in sand falling down a decent amount of lag is caused which can even crash the server when you place multiple voxel balls right after each other.
The difference between arrow and gunpowder is very slight here, the only difference is the center of the generated circle being one block higher when using the gunpowder.
To get nice spheres, use /b b true (followed by /b b cm or whatever performer you want).
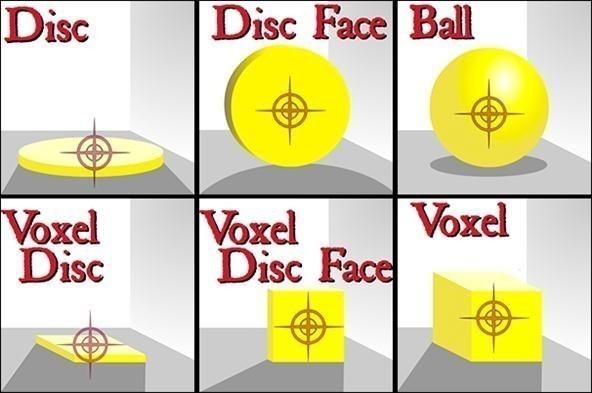
*3.4. Disc Brush
/b d m
Places a horizontal disc, if using the arrow the disc gets placed into the floor, with the gunpowder ontop of the floor.
3.5. Disc Face Brush
/b df m
Places a vertical disc, if using the arrow the disc gets placed into the wall, with the gunpowder next to the wall.
3.6. Voxel Brush
/b v m
Places a cube. Two things to keep in head while using this brush:
- The side length of the cube equals 2 x brush size + 1, so brush size 3 gives you a 7x7x7 blocks cube.
- The source block is in the centre of the cube, this means if you click on the floor with arrow/gunpowder half of the cube goes into the floor.
The difference between arrow and gunpowder is very slight here, the only difference is the center of the generated cube being one block higher when using the gunpowder.
3.7. Voxel Disc Brush
/b vd m
Places a horizontal square, if using the arrow the square gets placed into the floor, with the gunpowder ontop of the floor.
3.8. Voxel Disc Face Brush
/b vdf m
Places a vertical square, if using the arrow the square gets placed into the wall, with the gunpowder next to the wall.
3.9. Cylinder Brush
/b c m
The Cylinder Brush creates a solid cylinder. The following parameters can be defined:
/b - Brush size = radius of base
/vh - Height
/vc - Height of Center Block = if cylinder shall be pasted higher (positive values) or lower (negative values) than target block.
3.10. Line Brush
/b l m
The Line Brush draws a line between two selected points. The first point is selected by right-clicking with the arrow, the second point by right-clicking with the gunpowder.
Tip: If you need to draw multiple lines from one point, use the arrow at the center point and then you can use the gunpowder for all end points without having to set the first point all the time.
3.11. Triangle Brush
/b tri m
The Triangle Brush places a triangle. Use the arrow to select the three corners (right-click 3 times). To generate the triangle then click anywhere with the gunpowder.
3.12. Ring Brush
/b ri m
/b ri ir#
The Ring Brush works similar to the Disc Brush, but here you can set an inner radius with /b ri ir#. If you don't specify the inner radius it will be a full disc, if the inner radius is bigger than the brush size nothing will happen. Performer and inner radius have to be set separately.
3.13. Dome Brush
/b dome
The Dome Brush has following parameters:
/b - Brush size = radius of dome base
/vh - Height
(accepts no Performers)
3.14. Checker Voxel Disc Brush
/b cvd m
Places/Replaces selected block in a chessboard shape. Which 50% of the blocks affected can't be changed (so you can't make a full voxel disc by clicking on two adjacent blocks).
3.15. Jagged Line Brush
/b j m
/b j r# s#
Splatters blocks along a straight line.
Select first point of indicated line with arrow, second point with gunpowder.
The Spread (/b j s#) defines how far off the indicated line the blocks are splattered.
The Recursion (/b j r#) defines how often the splatter process is done. The higher the value the denser the jagged line will be. (values possible: 1-10)
The brush size does not matter here.
Example: /b j s10 r3
-----------------------------------------------------------------------------------------------------------------------------
*4. Erosion Brushes
Main brushes for shaping terrain.
*4.1. Lift Brush
/b e lift
Arrow: Adds material vertically.
Gunpowder: Removes material vertically.
*4.2. Fill Brush
/b e fill
Arrow: Adds material vertically.
Gunpowder: Removes material vertically.
Very similar to the Lift Brush (see above), but does not fill up terrain higher than highest surrounding terrain and does not lower terrain lower than lowest surrounding terrain.
*4.3. Melt Brush
/b e melt
Arrow: Removes material horizontally.
Gunpowder: Adds material horizontally.
*4.4. Smooth Brush
/b e smooth
Smooths out rough terrain.
4.5. Floatclean Brush
/b e floatclean
Removes single flying blocks. (Only removes them if really all 6 sides are towards air, groups of two floating blocks right to each other won't be affected.
4.6. Erode Brush [Not available]
Theres an issue with this brush and it's not working in the current version of VoxelSniper. See https://github.com/TVPT/VoxelSniper-TerraformingBrushes/issues/4
/b e
/b e e# f# re# rf# b#
The above brushes are only presets of the quite complex Erode Brush. The Erode Brush has following parameters:
e - Erosion minimum exposed faces
f - Fill minimum exposed faces
re - Erosion recursion amount
rf - Fill recursion amount
b - Brush size
4.7. Random Erode Brush
/b re
Using a certain Erode Brush too extensively may end up in unnatural smooth looking terrain. The Random Erode Brush randomizes the parameters of the Erode Brush with each click, while using the arrow tends to rather erode material and gunpowder rather to add material.
-----------------------------------------------------------------------------------------------------------------------------
5. Blend Brushes
5.1. Blend Ball Brush
5.2. Blend Disk Brush
5.3. Blend Voxel Brush
5.4. Blend Voxel Disc Brush
6. Splatter Brushes
6.1. Splatter Ball Brush
6.2. Splatter Disc Brush
6.3. Splatter Voxel Brush
6.4. Splatter Voxel Disc Brush
6.5. Splatter Overlay Brush
6.6. Blob Brush
7. Other terrain brushes
7.1. Fill-Down Brush
7.2. Drain Brush
7.3. Biome Brush
7.4. Overlay Brush
8. Special Brushes
8.1. Sign Overwriter Brush
8.2. Erase Brush
8.3. Entity Removal Brush
8.4. Ruler Brush
8.5. VoltMeter Brush
8.6. Scanner Brush
-----------------------------------------------------------------------------------------------------------------------------
*9. Stencils
Stencils are saves of typically smaller objects, usually trees, rocks and similar terrain features. The Stencil Brush and the Stencil List Brush provide the possibility to save such objects and place them in random order and orientation.
*9.1. Stencil Brush
/b st
/b st fill <name>
/b st load <name>
The Stencil Brush is used for both saving stencils aswell as placing certain stencils.
To save a new stencil, type /b st fill <name>, while name will be the name of your stencil. If you intend in creating a Stencil List (see below) afterwards it is easiest to name, for example, your trees like "pine_tree1", "pine_tree2" and so on.
To save a stencil place two block as selection corners (as in WorldEdit), compare this image:
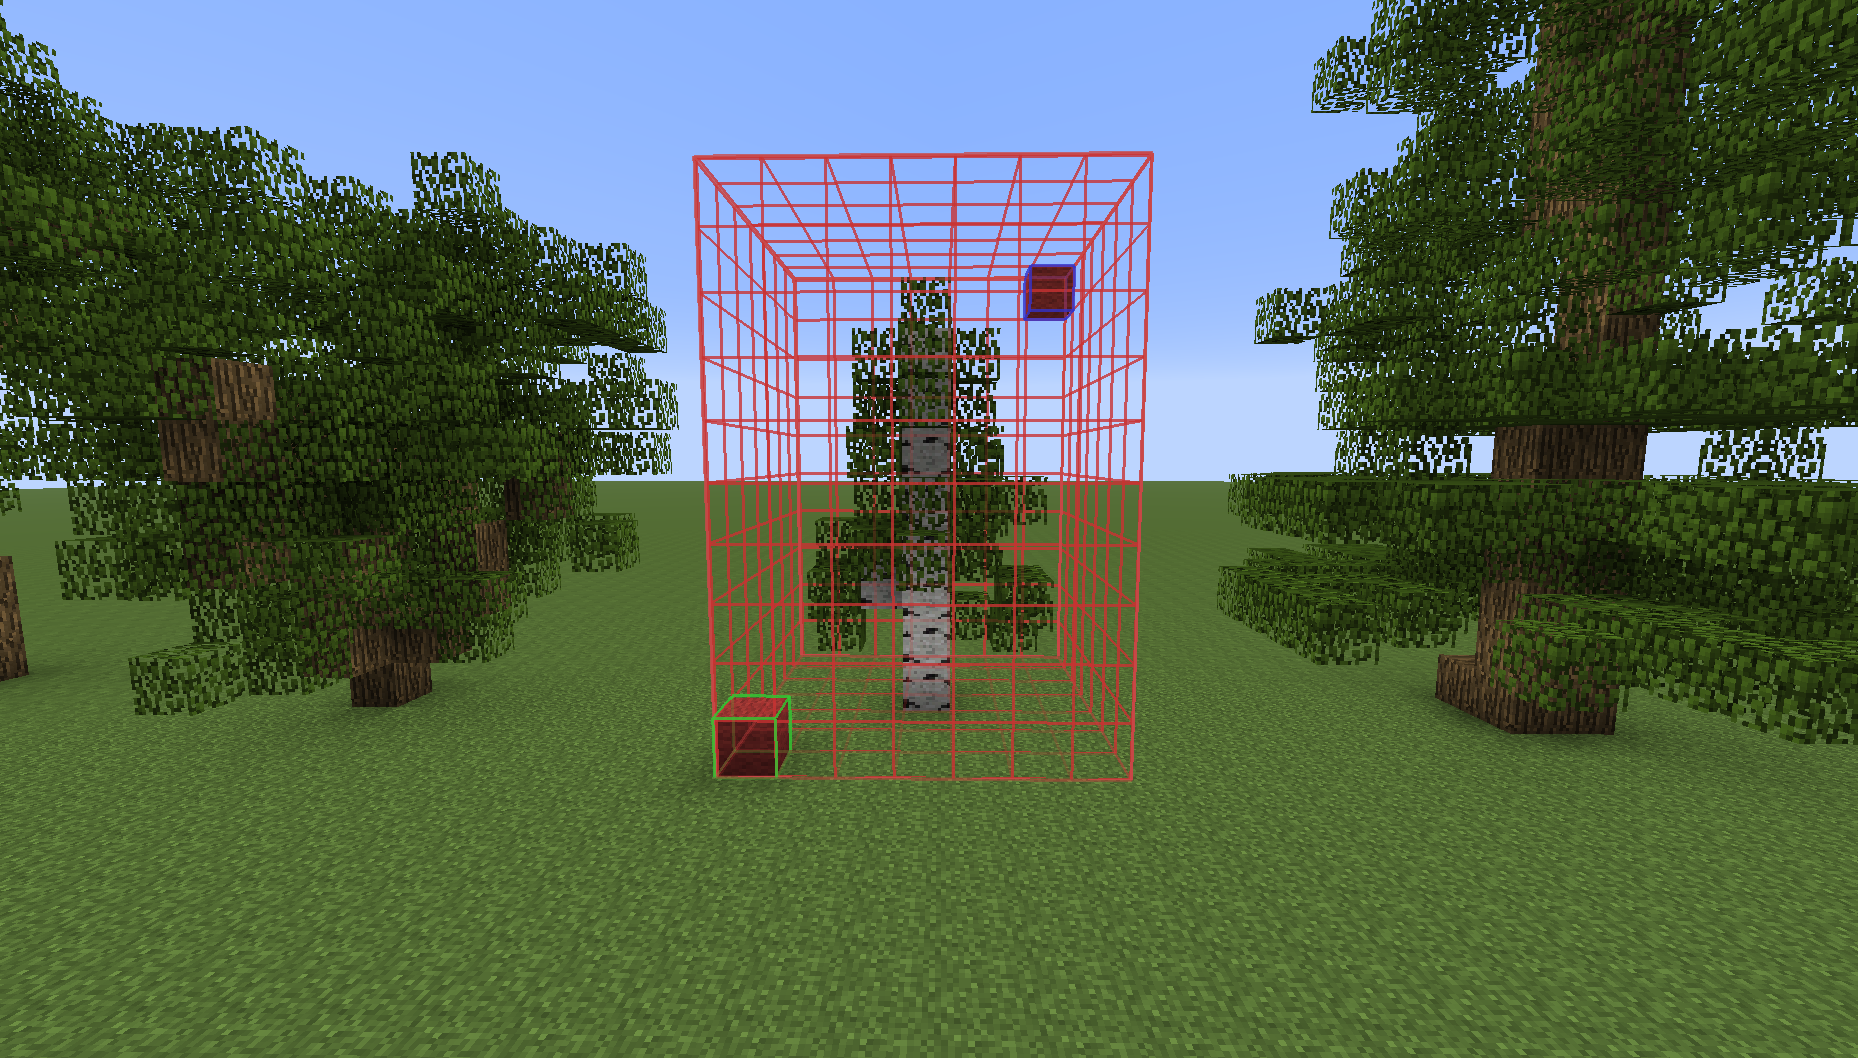
Next place the paste block. Your paste block will be the target block when using the stencil brush to place a stencil. For trees and rocks and similar things the paste block should be in the middle, one block below the object to save.
Now click the first of those corner blocks with the arrow, it should say "First Point" along with its coordinates. If it already sais "Second Point" you clicked already once somewhere. Best you do /d and start over with /b st fill <name>. If successful click the second edge. Now you need to remove the corner blocks you placed or they will be saved with the stencil. Finally right-click the paste block and it should say in chat that the stencil was successfully saved. Stencils are limited to a size of 100'000 blocks volume.
To paste in a certain stencil use /b st load <name>. If the stencil is available it should say so. Now type /b st and start pasting in the stencil using the gunpowder only.
*9.2. Stencil List Brush
/b sl
/b sl <name>
Stencil Lists are used to randomly place a number of stencils. E.g. to make a realistic forest out of some hand built trees.
Creating a Stencil List (not for MCME) does happen outside Minecraft: Navigate in your server folder to plugins\VoxelSniper\stencilLists. Create a new text file (.txt) there. Its name will be the name of your Stencil List. Inside that text file you write now all stencil names that belong to that stencil list like this:

This is all it needs to create a Stencil List.
To use it, type /b sl <name> while name being the name of the respective text file without the .txt ending.
Now click with either arrow or gunpowder to place randomly picked and orientated stencils from your Stencil List. (Both tools do exactly the same here).
For MCME Staff, which have no access to the server folder, read on...
*9.3. [Addon] StencilList plugin by CaptainDagless
This is an additional plugin not included in the default VoxelSniper plugin.
/sl
/sl create <list name>
/sl add <stencil name>
/sl save
This plugin was made by former MCME staff member CaptainDagless to make staff able to create Stencil Lists without being able to access the server folder. Attention: This plugin is a bit unflexible and some stuff can only be undone by the server Owner q220. So be very careful here.
To create a new Stencil List, type /sl create <name>, while name being the name of your Stencil List (without the .txt ending). Make sure your name isn't already taken using Voxelviewer (see below). You have to add now ALL stencils you want in your list using /sl add <stencil_name>. I recommend placing each stencil with /b st (see above) before adding it to the list. Once you've added all stencils, type /sl save. You can't make any changes to the list anymore now! No more adding stencils, no removing and no overwriting of the list!
To use your Stencil List, do now /b sl <name>.
9.4. [Addon] Voxelviewer
This is an additional plugin not included in the default VoxelSniper plugin.
/vv
/vv stencils
/vv stencilLists
This plugin can be used to browse the available stencils and Stencil Lists.
Using one of the above commands will list all files in that directory aswell tell what subdirectories there are.
To open a subdirectory type for example /vv stencils/tree, this can be continued for multiple subdirectories, e.g. /vv stencils/tree/holly
If a directory has multiple pages, use /vv stencils # while # being the page number. This works also with subdirectories, e.g. /vv stencils/tree/holly 2.
-----------------------------------------------------------------------------------------------------------------------------
10. Fun Brushes
10.1. Lightning Brush
10.2. Jockey Brush
10.3. Entity Brush
11. WIP
11.1. Canyon Brush /b ca
11.2. Snow Brush /b snow
11.3. Ocean Brush /b o
11.4. Flat Ocean Brush /b fo
11.5. Tree Snipe Brush /b t
11.6. Generate Tree Brush /b gt
11.7. Spiral Staircase Brush /b sstair
11.8. Copy-Pasta Brush /b cp
11.9. Heat Ray Brush /b hr
11.10. Comet Brush /b com
11.11. Move Brush /b mv
11.12. Set Redstone Flip Brush /b setrf
11.13. Ellipse Brush /b el
11.14. Punish Brush /b p
11.15. Clean Snow Brush /b cls
11.16. 2D Rotation Brush /b rot2
11.17. 3D Rotation Brush /b rot3
11.18. Shell Set Brush /b shs
11.19. Block Reset Brush /b brb
11.20. Extrude Brush /b ex
11.21. Underlay Brush /b under
11.22. Generate Chunk Brush /b gc
11.23. Spline Brush /b sp
11.24. Shell Voxel Brush /b shv
11.25. Clone Stamp Brush /b cs
11.26. Shell Ball Brush /b shb
11.27. Pull Brush /b pull
11.28. Set Brush /b set
11.29. Ellipsoid Brush /b elo
11.30. Block Reset Brush Surface Only Brush /b brbs
11.31. Canyon Selection Brush /b cas
11.32. Painting Brush /b paint
11.33. Three Point Circle Brush /b tpc
--- to be continued... ---
Source: Written by Finrod_Amandil using ingame experiences and various googled sites including original code of Voxelsniper on GitHub.
Last edited: